Showing posts with label Dress up Victorian. Show all posts

Wednesday, August 12, 2020

Truly Victorian natural form part 3 TV423 TV324 TV221

 Back to my Victorian natural form journey. This outfit was to be worn for the Victorian Festival fashion show but with all events cancelled it now hangs in my closet.

I used 3 different colors of silk taffeta. The main gown is Mandrake (deep eggplant), contrast is Mandragora (golden olive green) and a small accent of warm grey lavender. The first two fabrics were bought from Silk Baron and the accent fabric was from my stash.

I decided to push my skills a bit and added a back accent based on a gown at the MET, The Mrs. F.M. Carroll dress. It's lovely gown and the back of the bodice is very interesting and unusual.

TV423 Two Toned Bodice:

I already reviewed this lovely pattern so I'm just sharing some of my process on copying the back of Mrs. Carroll's dress. I would like to say I did some fancy math and sketched everything out in 100% perfect detail but.....Nope. After looking at the picture and counting how many bow shapes I was going to need I cut out the 2 back bodice pieces in muslin and started to sketch out the pieces on the back. I used iron away ink so if I made mistakes they would disappear. :-)

The interesting thing about the Carroll dress is if you zoom in you can see that some of the back bow shaped pieces aren't perfectly even. Nice to know that even such a beautiful gown has little discrepancies like that since my stuff is never perfect either.

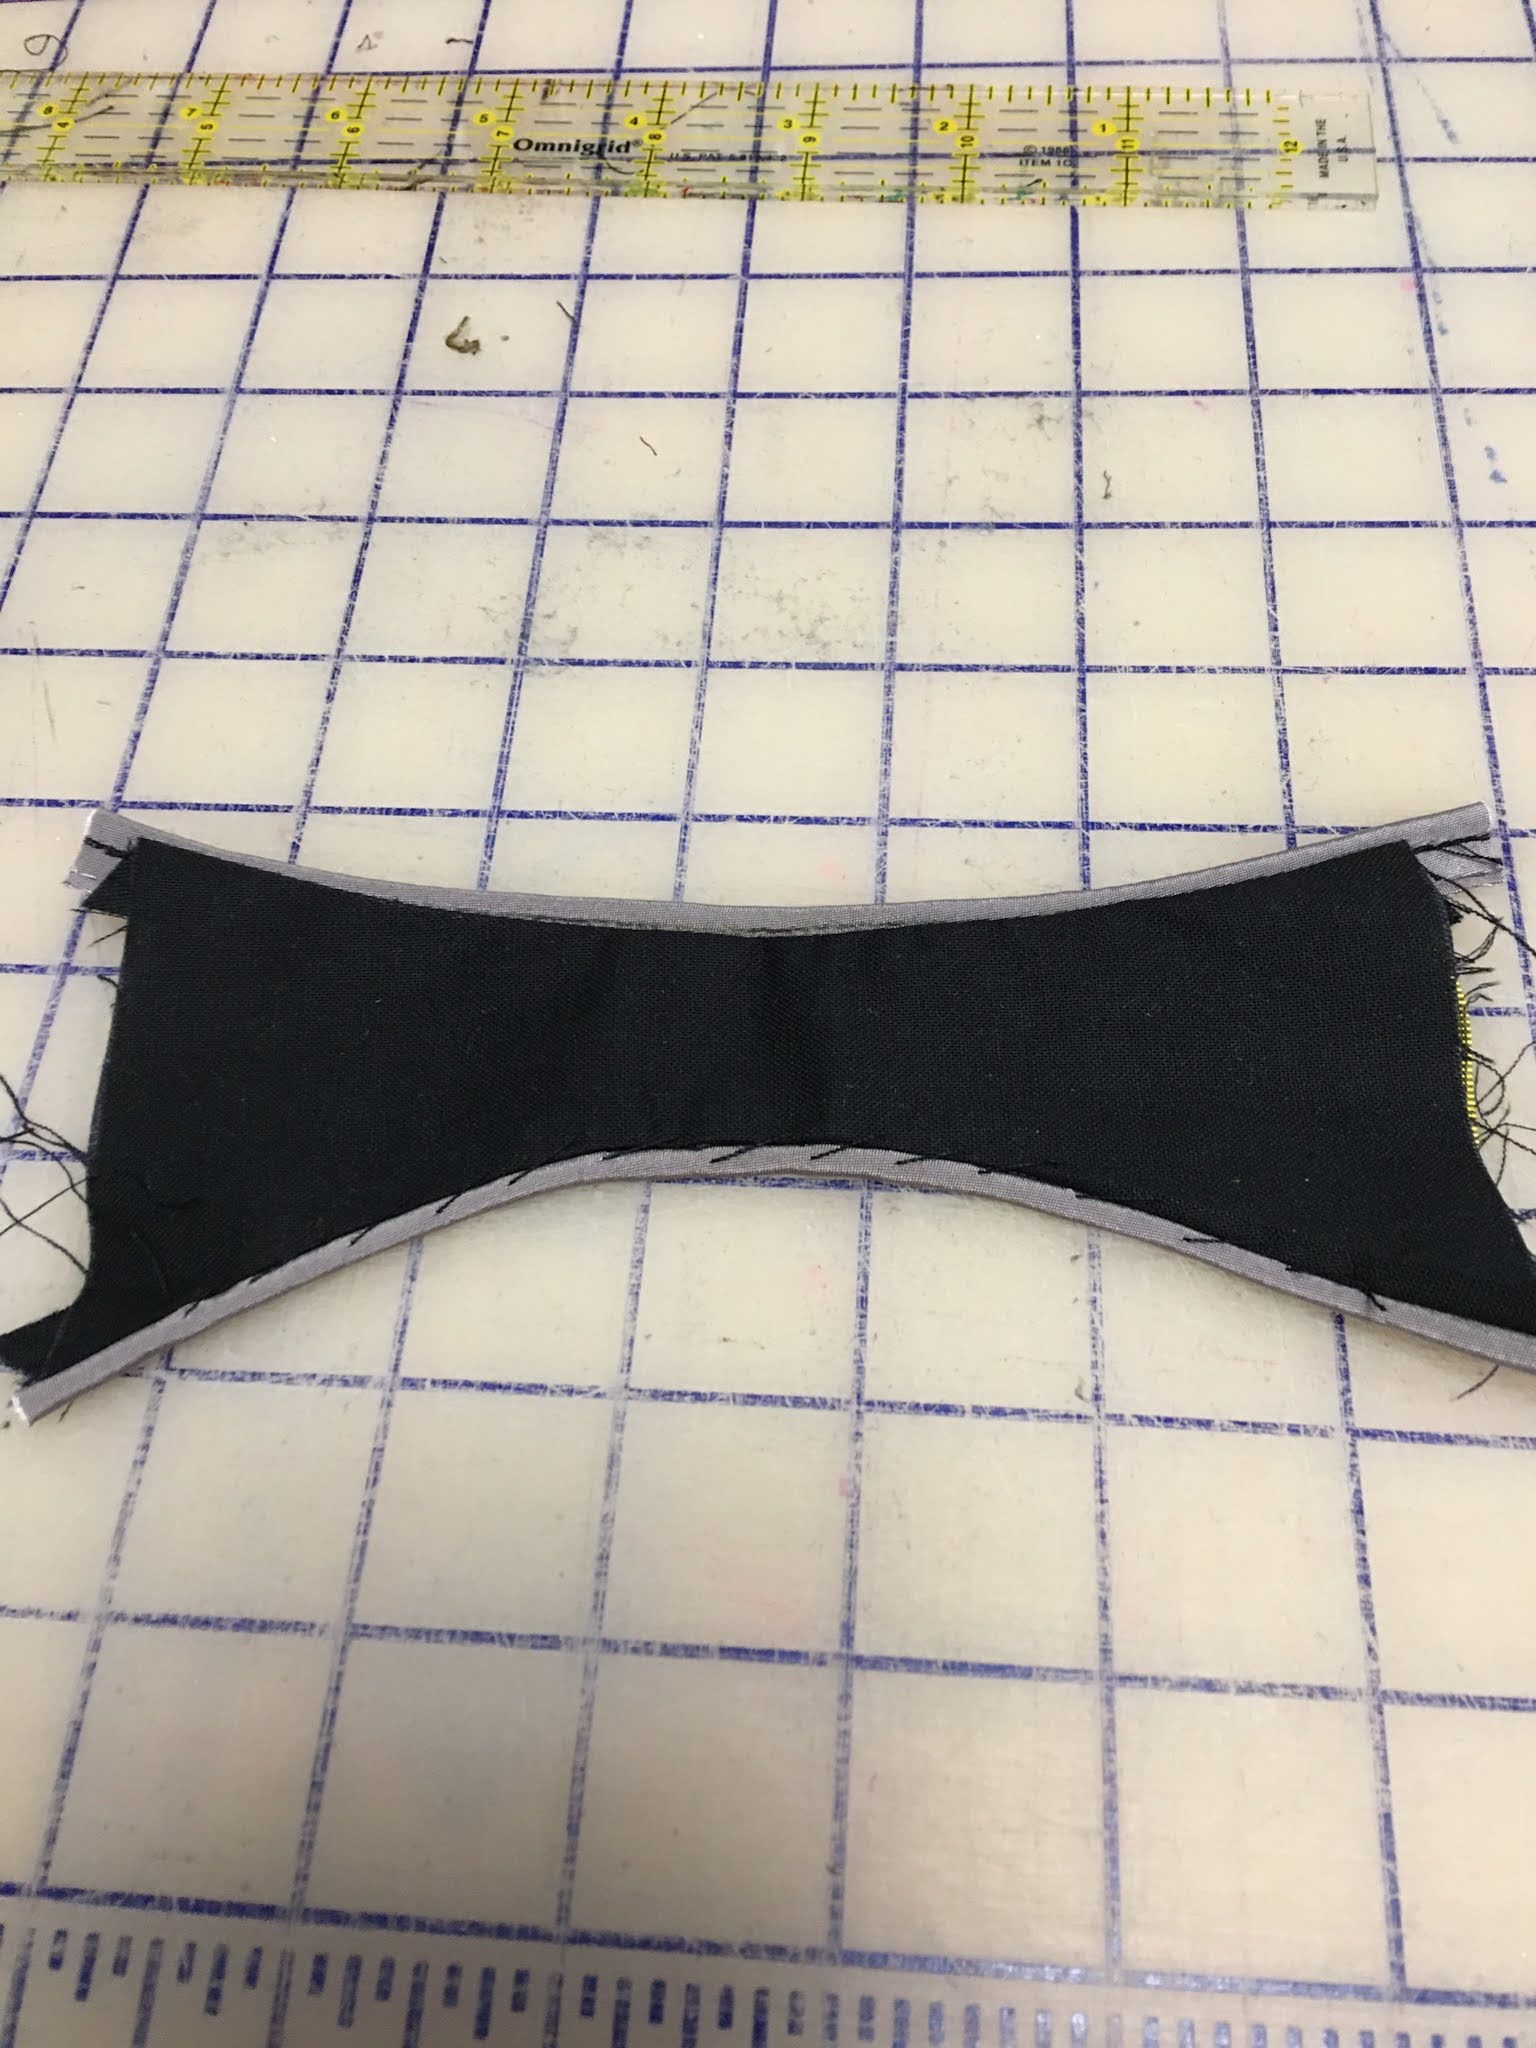
Here is the back cut out in muslin. You can see I traced out shapes down the back. Once the shapes were traced out I laid a piece of tracing paper over the back and traced the bow shapes. I added 1/2 inch seam allowance to each bow shape. Once the pattern making part was done I cut the shapes out in fabric and lining. I also made the contrast piping. I made a practice bow and realized sewing them RST on top and bottom and trying to turn them RSOut was a problem... The centers were too narrow to pull the wider ends through. 


So what I did is I stitched just one side and then I pressed in the seam allowances on the other side and whip stitched them together.


Here is the front of the finished piece.

Here is the back, you can see my very coarse whip stitching. Coarse is ok because no one will even see it. :-)

Once all my little pieces were stitched together I laid them out on the muslin to make sure I was headed on the right path. Now it was time to cut out the back bodice pieces. I decided to just cut out the back bodice in case this all went sideways I would still have enough fabric to head in another direction. 

After sewing the center back seam I began stitching all the little pieces down leaving about 1.5 inches in the center of each piece open so I could lace the fabric tie up the center back when it was time. The rest of the bodice construction was pretty standard. I did change the neckline and drafted out a different collar, I also made the sleeves 3/4 length. At this point I tried on the bodice and I didn't like how the top two bow pieces looked. My upper back curves forward (bad posture) and those top two pieces really drew attention to my upper back curve. So I took them off and I really prefer how for me, less is more. The thing to give thought to as you are contemplating design elements is your frame size. I'm not very tall and some design elements are too much for my frame. Also I am short waisted and all that detail going down the back was a bit much. Another example, I have a short neck so when I'm making garments (even modern ones) I normally will shorten the collar stand and sometimes the collar piece itself just to make it fit my frame better. Sleeve cuffs are another one. Sometimes they are too big visually for my small wrists so I will make them smaller so they don't overwhelm me. Hopefully this makes sense. :-) 

Once the bodice was completely finished I used an extra long piece of ribbon and wound it up thru the center back openings to see how long to cut my fabric. I essentially made a narrow tube the length needed and just threaded it up through the center back. For the bottom of the fabric tube I just copied the original dress as best as I could interpret it. It looks like 3 loops, 1 knot and then three hanging streamers of fabric. That was my best guess.

There are other style details I added to the bodice that aren't part of the pattern. I just looked at fashion plates to find things I liked and then played with tracing paper and the pattern pieces. It all came together very well in the end.

TV221

Tie back underskirt is just that. I added pleated trim to mine and the top part of the skirt is actually cheap home decor cotton so I didn't waste any good silk on a part of the gown no-one would see. This skirt goes together easily and I had no issues with it.

TV324

Long draped overskirt. This is another simple make and my only dislike is how droopy it is. Even with nice crisp taffeta. I tacked some of the pleated gathers to make it drape better and overall I like the finished result. 


The eggplant colored fabric like to photograph brown but it's really not. I think the camera picks it up as closer to Aubergine which does have brown tones to it. The green is pretty spot on in color. Both fabric were bought from Silk Baron.

Well I hope you enjoyed this post. I quite like natural form and will certainly make other garments. Thanks again for tuning in to the chronicles of Mimi.

Wednesday, April 12, 2017

Port Townsend Victorian Heritage Festival 2017

The first weekend in April was the Victorian Heritage Festival in seance Port Townsend, Washington. I was somewhat surprised to see VicFest on the calendar because 2016 was supposed to be the last year due to lack of volunteers. Happily enough some wonderful folks stepped up and decided to revive it. There is already talk of a 2018 VicFest, how fantastic is that! I participated in the fashion show on Saturday. It was so wonderful to see many of my friends and we all had a wonderful time! Here are some random pictures of the event.

 At the Commander's Beach House for tea! We were very color coordinated that day.

 The lovely Lady Rebecca

 Caught taking a selfie!

 Once a mom always a mom, helping with shoes.

 Commander's Beach House and good friends!

 I'm so famous!

 This guy...He must have taken a wrong turn at the border. This was my fashion show outfit. Truly Victorian walking skirt and Eaton Jacket. You can't ever go wrong with those two patterns.

 Lovely view!

 Lady Rebecca and her magnificent bustle!

 Tea time!

 Two of the most lovely people!

 Ready for the dance social! Truly Victorian Umbrella skirt and 1883 Tail bodice.


The skirt is one piece cut on the cross grain. It works very nicely with a horizontal striped fabric. With careful cutting and matching the back seam stripes will chevron. It looks awesome, but of course you can't see it. ;-) 
 I do have plans for a true 1890s bodice. The one I was working on did not pan out, so this was my back up. 

Monday, April 3, 2017

My Edwardian plaid outfit Truly Victorian patterns TVE30 and TVE45

This last weekend was the Port Townsend Victorian Heritage Festival. There was much fun having!

I must admit to being completely and totally inspired to make this when I stumbled across The Antique Sewist's blog. She made a plaid version of TVE30 and TVE45 and I fell in LOVE! I knew at that very moment I needed a plaid Edwardian outfit. Nothing would stop me, even the lack of plaid fabric in my stash. I already had both the patterns and just needed some kind of fabric to fulfill my plaid dreams. A few days later I was at one of the local fabric watering holes and stumbled across this somewhat bright turquoise and purple plaid. It was love at first sight! It was on sale too!! So I quickly bought some and lovingly cuddled it all the way home.

I will start with TVE30, the skirt.

Sizing and alterations:
I cut a straight size I (36 waist). In my Edwardian stays I measure 43 bust, 37 high waist, 36 waist and 43 hips. You really want to pay close attention to your high waist, the is your jumping off point at fitting this skirt. Now as you can plainly see from my measurements I am not concerned about my hips. If you have a nice hip spring you would cut your hip size and blend it to your waist size, or you can play with the darts for adjustment. Also if you are taller than 5ft 4in you will want to lengthen the skirt. My alteration was fairly simple since I only needed a bit of extra waist room. I made the skirt darts a tad bit smaller (about 1/4 off each dart side at the top) and then blended it back into the rest of the dart. That gave me about an extra inch. For the inner waistband I just made it a bit longer and folded in the ends to make the belt fit my high waist. There are very small darts on the inner waistband and they are so teeny I didn't want to mess with them. That was it. The length was perfect for me and my 2 inch heels.

Fabric:
Yeah, I loved that plaid until I realized how uneven it was...I am somewhat impatient. Even plaids and even stripes are not super difficult to work with. However, when you toss the word "uneven" into the mixture things get dicey. So turning to my trusty Vogue sewing book I read about uneven plaids. Hmmmm...Not for the plaid novice. Great! It takes a lot to discourage me. And I was going to have that damn plaid dress, even if it killed me. Vogue says on the uneven plaids you have to pick a focus point on the plaid and just run with it. That is what I did.

 I patiently cut out my pieces in a single layer trying to keep it matched on my chosen focus point as I could. I knew with the lapped seams the plaid wouldn't be a perfect match but I managed to get close enough. It's certainly not perfect but I am pleased with my effort.

My fabric was some kind of mystery blend not quite mid weight suiting. I underlined my skirt with quilting cotton. Please, underline your garments. They hang so much better and you can just transfer your marks to the underlining. So easy. I used petersham ribbon for my belting. I found some on Etsy and bought several yards. It's light blue, but no one can see it anyways.

Construction:
Not difficult. On my underlining I marked ALL THE THINGS. Every seam line, every dot and dart. Read the instructions carefully and follow them. The skirt came together like a dream. The placket seaming instructions seem strange, just follow them. It will be ok. I chose to use buttons as my main closure. I would rather make buttonholes than sew on a million hooks and bars.

Final thoughts:
I love this skirt! I even made another in dark navy wool suiting. It goes together much quicker when you aren't worried about matching plaid. A very satisfying project. TV gives great fitting info with the pattern.

TVE45 Narrow Panel Blouse

Really quick and easy to make. Since my bust is 43 I decided to use size H (44), view A with 3/4 sleeves. I did no alterations.
My fabric was not a bordered fabric but I went with view A anyway. I decided to cut my center panels on the bias so I wouldn't have to worry about plaid matching. I accidentally gave my blouse shoulder seams because I wasn't paying attention to the fact you have to tape both pattern pieces together at the shoulder to make it a single piece. (duh). Sewed up like a dream.

Final thoughts:
Easy. Great for a beginner. Instant gratification. I will make more of these.

Underneath it all:
Combination underwear, corset, stockings, a single petticoat. My under blouse is a lucky vintage find (because it is a larger size). Time wise it is WWI era but I didn't care because I didn't have to make it. I also loathe high collars. So this was a nice compromise. The blouse is completely hand sewn. It is labeled The Butterfly Blouse, size 42. It has a few minor flaws but that is to be expected. I will make a proper blouse to wear under this top, someday.


Monday, February 27, 2017

Port Townsend's Victorian Heritage Festival 2017

I can't believe I am typing these words! Last year we thought VicFest 2016 was going to be the last year. The planners wanted to retire and no one wanted to take it on. Happily some wonderful people have decided to keep the dream alive! So without further ado...........

The most wonderful, fabulous, awesome festival will be the first weekend in April 2017! Port Townsend's Victorian Heritage festival! Psh....you say! Why would I want to go? Well, why not!! Here are just a few reasons:

March 31st (Friday)
Pub crawl!
What a great way to get acquainted with this fantastic Victorian seaport! Grab some friends and make some new ones along the way. Find some delicious eats and drinks. Don't worry about driving either. You can just stroll back to your lovely hotel room and sleep it off. ;-)

April 1st (Saturday)
Victorian fashion show! Come and enjoy an hour of beautiful Victorian costumes.
High Tea! More information on the teas will be available in the next week or so.
Historic building tours!
Historic presentations on neat stuff!
A ball and Contra dance! Show off your dancing skills and lovely costumes.

April 2nd (Sunday)
Before you have to leave us, spend the afternoon browsing antique shops and many other fantastic shopping venues.

What do I think is the BEST part of VicFest? Well...you can dress up ALL weekend! Yes! What a great way to truly immerse yourself in the festival. Or you can pick and choose what events you wish to dress up for. Of course those of you who enjoy history but do not costume, please don't feel left out. We want everyone to come and enjoy Port Townsend! :-)Please come and join us for a fabulous weekend! xoxo!

Here is the link to the festival information. Stay tuned to the site because they will be adding more information. :-)

VicFest 2017