Monday, June 10, 2019

18th century sewing Tailor's Guide pattern revisited and other activities!

Oooooooooo I have been SO LAZY regarding this blog. However, I'm here now so I may as well post something. :-)

I'm not really in a rut but I have been on a slight break with my costume sewing. I also sew modern clothing and my summer wardrobe was looking pretty sad. So I set aside some time to make new tops. I still have some additional items to make but I started to get bored with modern clothing, as you do. It's always a challenge keeping myself focused on current projects. My mind starts to wander. Lately it's been wandering to the 18th century.

Tailor's Guide gown, again:

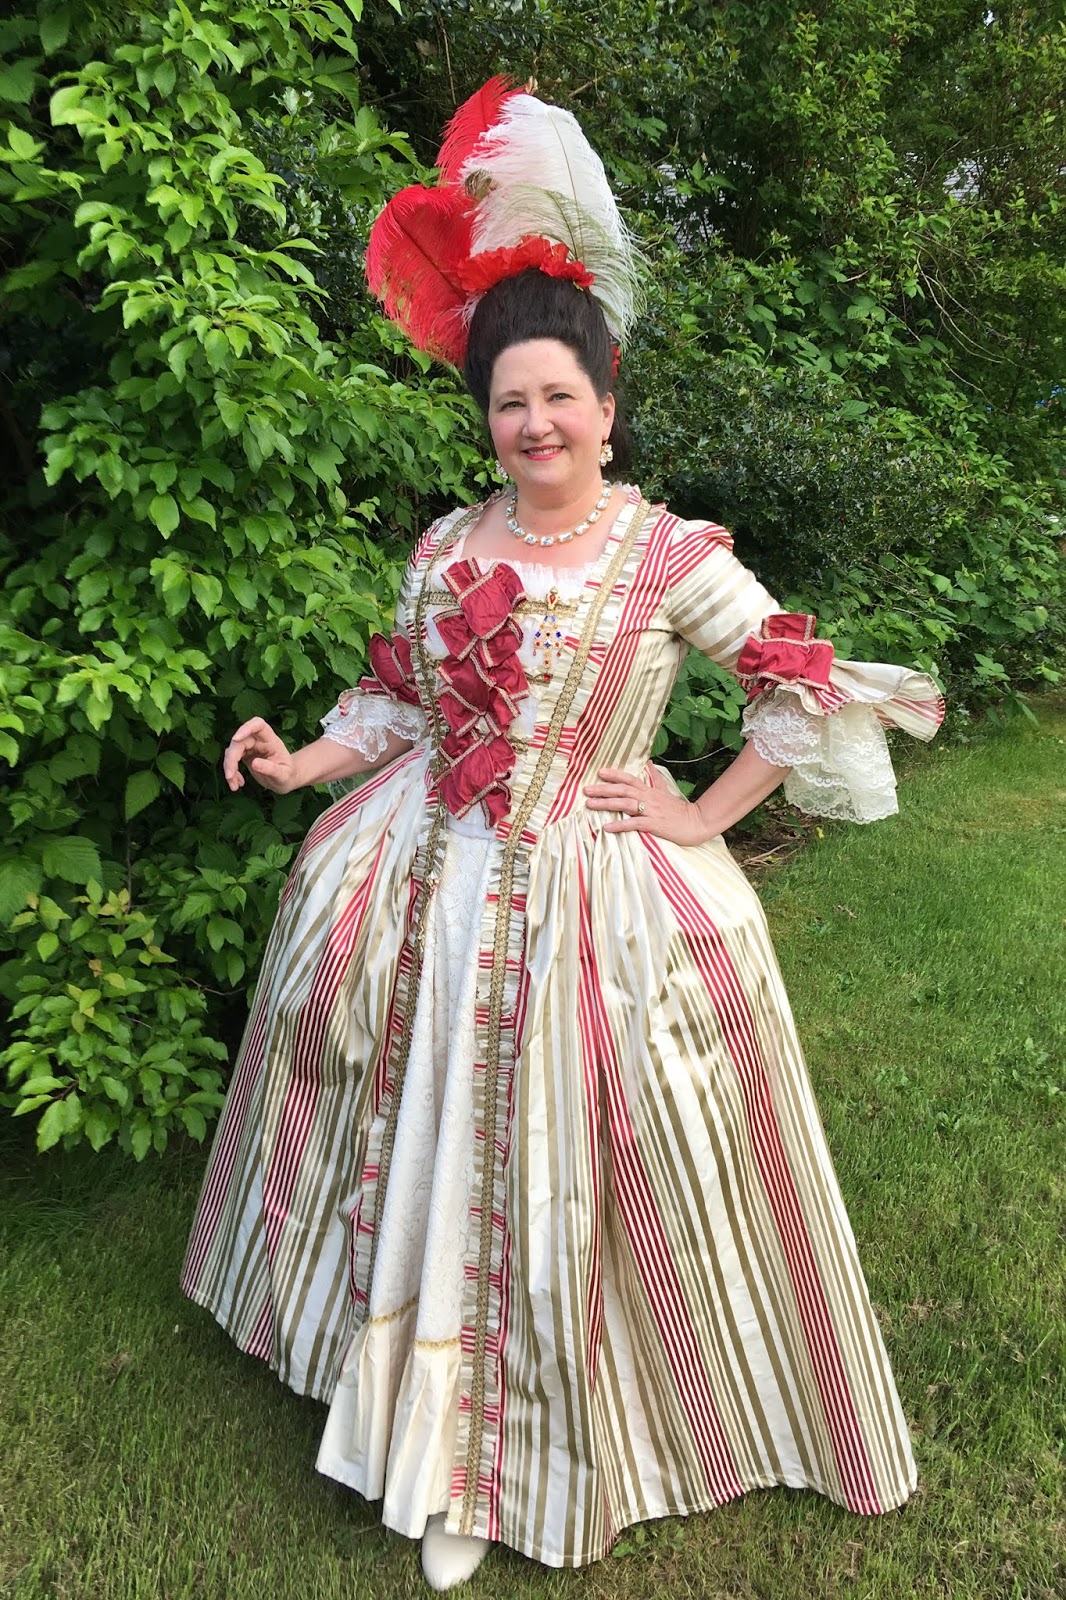
I have attended Vampire's Masquerade Ball for the last several years. It's in Portland, Oregon. This year they had a new venue! The Portland Art Museum. I decided to make a new 18th century gown because I totally need another......;-)

 I dug out my Tailor's Guide 1750-1785 gown & short gown pattern. I have already reviewed this pattern in 2016. I have no clue about historical accuracy but it does make a lovely gown. Also I finally learned to make pretty and very silly five loop bows thanks to the American Duchess 18th century sewing book. So I took advantage of my new skill and put 5 of those puppies on my new creation.

The dress went together without any problems. Sometimes it's nice to use a familiar pattern. I also didn't need to make a new petticoat. I used the same one I made for my first Tailor's Guide dress. Score! The candy cane striped silk has been in my stash for a couple years. I was down to scraps when I finished. It is so satisfying to use stash fabric and to be happy with the result.

 I'm in love with my Dames a la Mode necklace and earrings! I decided on clear stones with a gold setting. That way I can wear other color earrings with the necklace. I am having an ongoing love affair with her Girandole earrings. They look so decadent. I felt "extra" fancy at VMB.

 Me and Ms. T. 

 In the dark ballroom at VMB

 I had my youngest take some decent photos of the new gown once I had finished it. I also did a dry run with my hair and feathers.


Feeling very queenly and super fancy!

I also purchased a "piety" brooch to wear from Queen and Cavendish on Etsy. It's quite lovely! I have a pair of earrings from her shop as well that I wore to the Outlander Ball in April. 


A bit more 18th century:
JP Ryan English Nightgown redux.

I went back and re-trimmed my first 18th century silk gown I had made for Venice is Sinking back in 2016. I wanted something less flashy that could be worn during the day or evening. I LOVE the fabric I used for this dress. Chartreuse green! One of my favorite colors. It had a lot of gold metallic trim and sequins on it plus the skirt decorations were meh... I had only worn it the one time to VIS and it has been languishing in my closet ever since.

I pulled off all the gold trim, sequins and sad little skirt bows. I had a silk rem that was pink floral striped so I pinked narrow strips and stitched them on top of the existing pink silk trim. I also replaced the sleeve ruffles and added a bow to the bodice. I love the new look! Now I just need an excuse to wear it!

 This would be for evening but I can easily add a fichu and cap for a more formal daywear look.


2016 on the left and 2019 on the right.

And last but not least it's time for a proud mama post!

I am pleased to announce that my youngest is going to be participating in the Northwest Colonial Festival! He will be part of the Redcoat unit fighting against the Patriots during the battles of Lexington and Concord. The festival is August 8-11th at the George Washington Inn in Port Angeles, Washington.

There was a meet up last month in Port Gamble and my boy was happily accepted into the British army. At 14 he is old enough to discharge a weapon so of course he is thrilled!

 Serious picture time.

 Trying to pass muster.

 Learning to properly discharge a weapon.

 Proud mom!

Heading off to battle!

Sunday, February 3, 2019

Simplicity 8411 Claire's Outlander Red (not red) Dress

So there is an Outlander ball next month that several of us are planning on attending. Of course I wanted to make a new gown!

If you are interested in the ball go here Outlander Fanatics of Washington State You will need to join the group and then you can get all the ball info and how to get tickets. :-)

Pattern:
Based on the 18th century Robe de Cour. Dress laces up the back, 3/4 sleeves and separate skirt which is cartridge pleated to a waistband and hooked to the bodice. The bodice is fully boned and acts like a a pair of stays. The pattern also comes with panniers that are the perfect size for the skirt.

Fabric/supplies:
Vespers silk taffeta from Silk Baron (yummy!!!) Embroidered net lace. Pink tulle strips and silver gimp braid for bodice trim. Misc lace for sleeves and lace tucker inside neckline. I underlined the bodice with down proof ticking and it is lined with cotton sateen. Boning is all plastic.

Size and alterations:
I checked the finished bodice measurements before I decided on size. I was a bit apprehensive because when I costume I normally have stays or corset so my measurements are static. With this pattern there is no need for stays so I used my standard measurements which can fluctuate a bit from day to day. :-/

Looking at the finished size measurements I knew I would want to size down at least one size range. Simplicity notes that ease above body measurement is 1/2 an inch for this gown. Hmmmmmmm..... However if I am treating it like stays then I want a bit of negative ease so I have some support. The big 4 patterns seem to think we need ease in corsets and stays. That would be a giant NO. My aim was for a 1 inch back lacing gap.

Going by bust size I fall between 20 and 22. I decided on size 20 based on the finished garment measurements. Because I'm short between my apex and shoulder I cut size 16 for the neckline, shoulders and arm openings. Size 20 was for all the other seams. If I had cut size 20 for everything the neckline, shoulders and arm openings would have been way too large. I also used size 16 for sleeves.

The only alteration I made was taking the V cut out of the bodice neckline.

Panniers:
Easy to make. I did use plastic coated hoop boning for mine instead of the featherweight boning requested on the pattern envelope. I wanted them to be able to support the weight of the skirt plus two under petticoats. The skirt really looks better with a couple of petticoats underneath so the hoop bones don't show.

Skirt:
I used size 22 for the skirt/petticoat. You are using hooks and bars so you will want some tension in your waistband (NO ease!!) I notice the big 4 patterns also like to put ease in waistbands too.

The outer petticoat (AKA skirt) is made similarly to an 18th century skirt/petticoat. It has a front and back waistband that close together (overlap) on each side with hooks and bars. It is open from the waistband down about 9 inches on each side so you can wear a pocket in the 18th century style. The skirt front and back are cartridge pleated to the waistband. It is not difficult to do but it's very time consuming because it is done by hand. If you need a good tutorial on this go here-- Historical Sewing

The instructions are good for the making of the pleats but lack on the attaching them to the waistbands. The instructions don't show sewing it to the waistband RST and then hingeing it up like I have done in the past. Use the Historical Sewing tutorial instead for that step. It will look much better.

The downside of multi sized patterns is apparent in the skirt. The skirt pattern pieces are the same measurement for every size. The larger you are the less pleat density you will have. Using a thin fabric makes them even more sparse for us plumper ladies. I did use some interfacing to thicken up my fabric up to the fold line on the top of the skirt. I'm glad I did but I still feel that my pleats are thin. It's not a deal breaker but if you are in the larger size range you could probably skip the cartridge pleats and just do traditional knife pleats, skip the fold over and attach it to a waistband in the traditional manner. This would in turn give you more skirt length since you aren't using the fold over at the top.

The skirt runs short if you are taller than 5ft 4ish. I am wearing a 1.5 inch heel and the skirt doesn't touch the ground. I'm not quite 5ft 4 inches tall without shoes on. You will want more yardage if you are taller.

Bodice construction:
I made one muslin. I stitched up the back and left the center front seam open to check fit.

Time consuming. Lots of boning channels to sew and boning to cut. I used mostly plastic except for the back lacing bones where I used flat steel instead. It gives more support to the lacing grommets. If you are putting tension on your lacing you don't want flimsy bones that will buckle. Slimmer ladies may not have that issue.

Inserting sage advice here:
Set in the grommets asap once you have the bodice put together and the back boning channels done. That way you can try it on and make sure you want to keep going.

If I make this again I will not insert the boning until I have the sleeves put in. The instructions have you put in all the boning, bind the bottom and then put in the sleeves. That was a HUGE pain in the ass. All that boning flopping around while maneuvering sleeve sewing thru my machine.

More sage:
I used the rabbit ears method for my lacing while making the gown. I was able to easily loosen and tighten my laces so I could just pull it on over my head and tighten away. No lacing help needed.

Bodice construction continued:
The bodice went together fine until I got to the sleeves. The sleeves are very generous in size. Even the size 16 I used are roomy. If you have very full upper arms you may not need to adjust them.

The only way I was able to get the sleeves set in so the dot matched up to the shoulder seam was pleating them towards the front, not the back. Even the line art in the instructions show the pleats folded to the front in the first drawing and then to the back in the second drawing.

On outside of sleeve pleats are going to the front.

Next step the pleats are folded in the opposite direction. You can only see the inside of the pleats here but if the inside folds are pointing to the front then the outside folds will be pointed to the back. When I had them pleated to the back as shown that dot was nowhere near the set back shoulder seam. 

I first basted my sleeves in with my pleats to the back. I really didn't like how they looked. I have the same feelings when I look at the Simplicity website pictures.  I went back and refolded the pleats to the front (hey that dot finally matched up to the shoulder seam!!!!) and set them in. I don't know that they look any better but that damn dot was matching up so now I can at least sleep at night.  I decided to just leave them like that and let it go. Pleats to the front or pleats to the back....well it's only a costume anyway and I tend to do my own thing so...

A bit more sage:
If I ever made this again I would grab a different 18th century sleeve pattern and go that route. I don't like the sleeves on this.

More on the bodice:
The bodice is quite short. I'm short waisted and this fits me perfectly. If you have a longer waist you will definitely want to make adjustments. I visited the American Duchess blog here American Duchess Simplicity 8411
to get some guidance on this style of gown and decorating the bodice. It was very helpful!

Final notes:
I do recommend this pattern. I would say not for a beginner. Intermediate and up. The sleeves are meh. On the other hand, slap enough lace and bows on them to draw the eye away from the sleeve cap. ;-)

The costumes from Outlander have gotten a bit of hate but the red dress was a particular target. I don't watch the show and haven't read the books in years. I have seen enough still shots to understand the controversy. Whatever..... I didn't choose this dress for historical accuracy. I wanted a big 18th century-ish gown with a really full skirt. I'm happy with the end result in spite of the sleeves. It's a labor intensive project overall and even more so if you are decorating the bodice. Yay pictures!!


Here are some pictures from the Outlander Ball!

 Hitting on the cardboard Jamie.

Silly 18th Century shot!

 Claire needs to STEP OFF!


 The Countess was also taking advantage of cardboard Jamie

 Selfie time with Lady Champagne!

 The always lovely Countess!

 Myself, Lady Rebecca, Lady Champagne and the Countess.

 Always fun selfies with the Countess!

 Lady Cynthia writing letters!

Mirror selfie!

Saturday, February 2, 2019

Laughing Moon Pattern 138 Regency Gown and time for a ball!

Oh it was that time of year again!!! The Washington Regency Society's 12th night ball. It was fantastic and so thoughtfully put together. Of course I needed a new dress for it! I wanted to dig into Laughing Moon 138 for awhile so now I had an excuse.

Pattern:
Mid to later Regency with loads of different trim/neckline/sleeve options. The waistline is a bit lower and there are bust darts. The dress buttons up the back.

Size:
I am pretty much a size 22 in LM patterns so that is what I used. I made no alterations.

Fabric:
Silk shantung for the dress and cotton for lining.

View:
I used the mid neckline and the slash and puff sleeve. The trim on the skirt and bodice was my own design.

Directions:
Great! I have no complaints. The slash and puff sleeves are time consuming but worth it. They do require some hand sewing.

The darts, oh the darts:
Soooooooo......The darts are very high and very pointy. I don't care for them. Next time I will use gathers. One of my friends made her bodice with gathers and it looks really nice. I was unhappy enough with the darts so I covered them with some gathered trim.

Final thoughts:
This makes up into a lovely gown. I will use this pattern again for sure!


The ball was great fun! I didn't really take any pictures since I was too busy having a good time. ;-)


Tuesday, January 15, 2019

Burda 2471 Men's Regency era pattern AKA Napoleon pattern

It was time for the Washington Regency Society (WRS) 12th night ball! I asked my youngest if he would be interested in attending with me. He had joined me for the WRS picnic last summer and had a great time. I knew if he was going to go he would need something to wear. My dilemma, he is 14 and still growing. I started out looking at the Laughing Moon patterns but I didn't want to go that in depth for a costume that won't fit him in 6 months. I landed on Burda 2471. I had used the vest pattern last year for the WRS picnic. The cut and fit were really good. After getting his measurements I realized I needed to go up to the next size on the vest because he had grown again since summer!! The only part of Burda 2471 I wasn't interested in were the breeches. They are a very modern tight cut and require fabric with some stretch. Lol. My son took one look at the picture of Napoleon's tight white disco hot pants on the pattern envelope and said yeah, no.

So what pattern did I use for his breeches? Simplicity 4923 to the rescue! The whole pattern is fantastic. I made the entire suit for my husband a couple years ago and it turned out great. If you are looking for a basic no frills pair of drop front breeches Simplicity 4923 is perfect.

Let's go!

Size and fabric:

I decided on the size 38 chest. His chest measures 37 so I checked the finished measurements and knew the 38 would work. Do yourself a favor and make the breeches and vest first. My son uses a tux shirt for costuming. Once I got done with the vest and breeches he tried all components on and I measured him again before jumping the gun on his jacket.

I wanted the costume to be washable if needed. I used red canvas for the jacket and navy brushed twill for his vest, breeches and all the contrast on the jacket.

Alterations:
None.

Construction:
This went together really easily. Just follow the directions and you should have no issues. Be aware that Burda patterns are a bit different from the Big 4.

End result:
I'm very pleased! My son looked quite dashing and he enjoyed both wearing his costume and attending the ball.

Side note:
The sleeve cap has too much ease. I had to pleat mine because the fabric was too thick to ease/gather. I also heard this from another costumer so I know it's not just me.

 Looking quite the young gent!


He spent the evening learning to play cards.

Thursday, January 10, 2019

2018 bits and pieces of costuming fun and upcoming events!!

So I have been fairly neglectful of my little blog. Life happens and things get busy. I have been enjoying some outings but also spending time at home with my guys. Since I am very lazy I will just post some pictures from activities since summer. I do have some finished projects I will be writing about soon.


Costume College 2018!!!

Yes I did attend with the fabulous Countess! It was a really fun time. The first time I went I was on my own and I felt kind of awkward. Going with a friend is a blast and I highly recommend it! We also made a special trip to the fabric district. IT WAS EPIC!

Thursday pool party. I made a quick open robe out of a lovely fabric that I only had a small amount of.

Friday night social with the Countess! We had an open robe mini theme.

Val at Time Traveling in Costume was also part of the open robe mini theme.

 For the gala I decided on my metallic gold 1950s evening dress.

 Keeping things klassy. ;-)

Mirror selfie at the gala!

I wore my peacock 1912 gown to the Time Traveller Tea on Sunday.

Costume College was a lot of fun but it's not something I can do every year. Traveling is expensive and I had to curtail some of my local activities to afford it. Maybe I will go again in 2020 or 2021. :-)

October outing in Port Gamble:

A few of us decided to get together for a anything goes dress up day in scenic Port Gamble. We had a really fun time and enjoyed some champagne in the graveyard. It brought back the cemetery drinking  memories of my misspent youth in Seattle. I wore my red twill 1890s outfit and I was feeling pretty spiffy!


The local tea shop was having a Harry Potter day so The Countess brought her magic wand!

 Me and Lady Champagne, one of my favorite goth sisters.


Christmas at Fort Nisqually

The Countess and I seem to have made a tradition of going to the Yule Log ceremony at Fort Nisqually. It was a chilly day but mostly dry. I broke out my 1850s plaid dress and red "hussy" bonnet. I made a cute little cape of blue velveteen and trimmed it with marabou. Sewing that stuff on was not fun but the overall look is pretty fancy. I lined the cape with flannel for extra warmth.


I bought an up cycled fur muff for the fundraiser. It was made from an old fur coat. So soft and warm!

I hope you have enjoyed my posts from 2018! I do have a couple patterns to review and will hopefully get to it in the next couple weeks. 2019 looks to be a busy year of costuming! 

We are gearing up for VicFest in Port Townsend, WA! It's March 22-24. The planners are doing it a bit different this year. It will be more interactive with the guests. They want YOU to come dressed in your Victorian costumes. There will be a evening reception Friday night followed by pub hopping. Saturday looks to have a garden reception (possibly indoors due to weather), organized teas, fashion show and ball. Sunday will have more opportunities for tea and some shopping. Tickets are not for sale yet. Stay tuned to this page on Face Book for details! VicFest FB Page

Another event taking place is The Outlander Ball on March 9th. If you are interested in finding out more about this event you must join The Outlander Fanatics of Washington State Face Book page. There is a link to all the details there. Outlander Fanatics of WA

JASNA is having a full day and evening (BALL!!!!!!!) of Jane Austen! An Evening at Pemberly in Seattle Washington on April 6th. Here is a link for more info Puget Sound JASNA

Happy 2019!

Saturday, October 6, 2018

My experience with Truly Victorian TVE01 1903 Edwardian S Bend Corset

One thing I have been wanting to make for quite a while is an S bend corset.  I am not the most prolific corset maker because it's not my favorite activity. However, I really want to delve into this era and one must start with the proper foundations. I had already made some Edwardian combinations quite awhile ago. Probably my most favorite style of under garments. Alright! Let's go!

Pattern and sizing:

Multi sized with different cup sizes up to DD. The corset had 3 bust heights and 3 hips lengths. Really, I mean REALLY read thru her size selection several times. It will make things so much easier. By following her directions I only needed one mock up. First off don't over fit this corset. Use padding where needed. I have a hip/rump pad that I use under my 1890s costumes because my hip/waist ratio is very small. A little extra padding gives me a more hourglass shape.

What can be tricky about the sizing is waist/bust size. If there is 2 or more size differences between your waist and bust measure you need to reduce your cup size. I wear a D cup bra. Do to my waist/bust size I went down to a B cup. Trust me, it works. I started obsessing about hip size but stopped once I made my mock up and realized I had made them too small. I knew I was over thinking and went up one size in my hip area. I decided on the mid bust and longest hip length. If you have a tummy a longer hip length will be your friend.

Materials:

This is a single layer corset. I used beige coutil for mine. I decided on synthetic whalebone for most of my boning except for the back lacing bones, they are flat steel. She does not recommend spiral steels for this corset, only flat steel. I did cheat and used coutil lacing tape. The real good quality lacing tape isn't cheap. This is the only corset I have ever used it for and it was awesome! The tape has a boning channel on each side of the grommets. I bought mine from Farthingales and they have a tutorial on how to use it.

Directions:

Her directions are very clear. I didn't have any issues at all. There are no clearly marked boning channels on the front pieces. Look at the diagram and you will see where to place them.

Things I did differently and final notes:

I did add a couple extra boning channels on the back/side backs. This is just a personal preference. I also put in a double busk. A double busk is a wide piece of flat steel that you encase in fabric and sew on to the corset near the main busk. It makes it so much easier to do up a busk when dressing and add additional support. I don't do this when wearing a spoon busk. I have found that a lot of regular busks are flimsy and the extra bone behind them helps with that. Here is a link on the double busk process.


https://corsetmakers.livejournal.com/1692950.html

Also here is the type of under busk/double busk boning I bought.

https://corsetmaking.com/extra-wide-under-busk.html

TVE01 is a great pattern. I am totally pleased with the results and I am looking forward to costuming a whole new era!

Trying to be tasteful here....

 Here is my double busk. The bone does not need to be as long as your busk.

 Wrong side of double busk.

 Close up front.

I made some garters using 1 inch overall clasps, satin ribbon, no roll elastic and 5/8 inch sew on metal buttons. The overall clasps come with nail on buttons and they weren't cooperating with me.