Wednesday, May 25, 2016

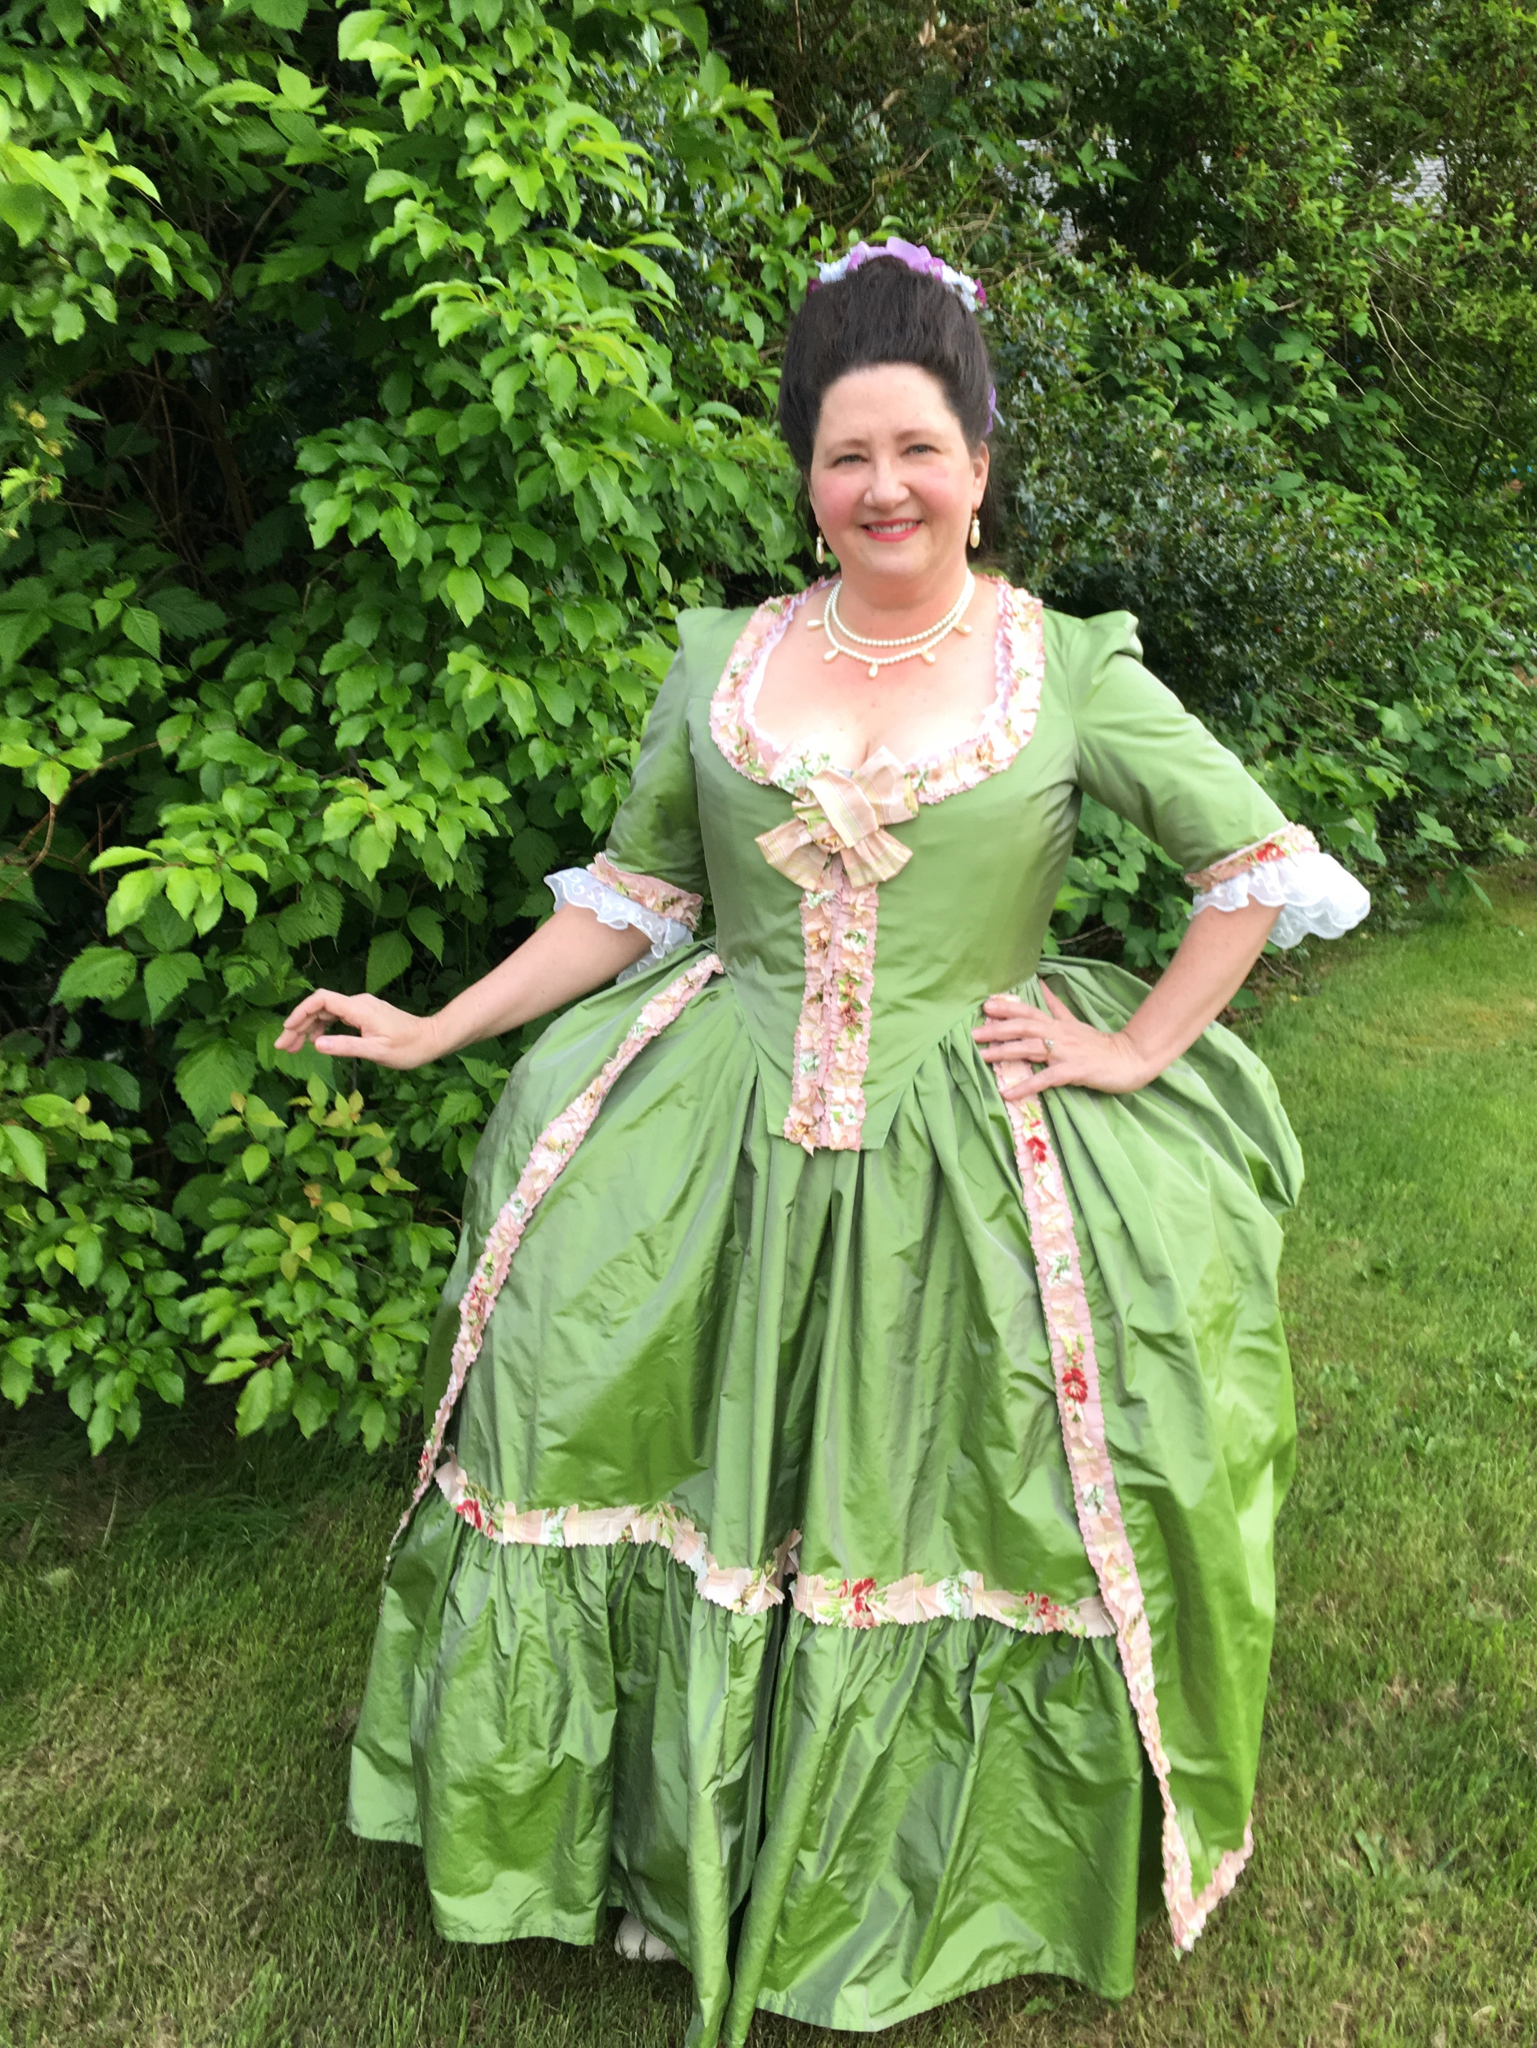
TV462 Tail Bodice and TV263 Imperial skirt Victorian Bustle Dress 1880s

Because I was in need of a fantastic purple bustle dress for an upcoming event. The Vampires Ball in Portland Oregon. I wanted something that was properly historical but still could be worn to a more non traditional event. Costuming takes time so I want things that are versatile. 
This is the second time I have made this bodice. The first time I was a novice at costuming and had never worked with a TV bodice before, just skirts. I would say get a couple of her bodices under your belt before using this one. TV400 is a good one for a beginner and you can use it for both bustle eras. 
I highly recommend this pattern. I made the open necked version in purple silk taffeta. I used my normal size and did my normal adjustments. This bodice is easy to put together and the pleats are not difficult. Just look at the diagram and read the instructions. When you make the pleat markings I suggest marking them on the right side of your underlining and the right side of your bodice lining, if you are lining the bodice. That way you can always see the marks and everything matches up. I did contact TV and asked if the puff sleeve from TV460 would work with TV462. She said yes. That is the sleeve I have used here. Such an easy sleeve to do! I also put a nice ruffle of lace around the neckline and on the sleeves.
Side notes:
My skirt is the Imperial skirt. As you can see I used it as a foundation and did my own thing. I am wearing the Imperial bustle and a bustle pad. I slip the bustle pad into the top of my bustle and it keeps the skirts from weighing it down. Hence the nice 1880s big bustle.
The flowers I made from various colors of lining fabric. I found a tutorial on YouTube. Yay for tutorials! They don't take long to make and have become sort of a guilty pleasure for me to make. I like that you can use inexpensive lining fabric for these. Because you use an open flame to curl the petals you have to use synthetic fibers. I tried a few different types.

Costume Satin: Underwhelming. A bit too heavy. Even the lightweight cheapy stuff was meh..
Poly Organza: Underwhelming also. A bit to springy and didn't curl as nice.
Chiffon: Huge PITA. Slippery.
Thin poly lining fabrics like China Silk: This particular brand works the best IMHO. I tried some other lining fabrics and they were ok, but not as nice as China Silk. Red has been the toughest color to work with so far. Something about the color causes it to blacken on the edges. Even if I hold it the same distance away as I do the white or pink. You can also use tulle but you don't need to put that near a flame.


Flower close up. And feathers, gotta have feathers.

Saturday, April 23, 2016

Truly Victorian Edwardian Underwear TVE02, awkward undergarment photos and the TMI restroom zone

I previously had made the TVE02 combinations in white batiste with the evening neckline. I really, really like combinations. Far more than the traditional drawers and chemise. Why wear two separate garments when you can just wear one! I will pretty much wear combinations under any Victorian era. Sorry, not historically accurate but much more convenient.

The evening bodice is the faster of the two to make. Great for low/wide necklines. After making the evening version I decided to make my next pair with the regular bodice. I found this gorgeous floral batiste online and it was pure love!! Once again not historically accurate, but who cares.

Really what takes the longest on the undergarments are all the facings. Once you pass that point they go together quickly. I recommend using a fusible interfacing or sew in for all the facings. I make my combinations to wear under my corset. So I use my non corseted measurements. I made no alterations. For reference I am 5ft 4in tall. If you are taller you may want to lengthen them, or not. This is a really great pattern and not difficult to use at all. I highly recommend it.

Awkward undergarment photos:

So, something I struggle with, besides body image is reviewing undergarments. I don't know why I feel so self conscious. Because certainly I am wearing MORE damn clothing than I would be at the beach!!!! It probably has to do with the fetishizing of corsets and underwear in general. I guess stockings, bras and garter belts fall into that category. So pretty much anything women wear under their clothing is fair game. Knowing this makes me feel a bit awkward about posting pictures and reviewing. I do recognize that this is my personal hangup. I am making an effort to move beyond it.

You will notice that I only take one picture, unless it is petticoats or a corset. There are two reasons for this. Number one, I am lazy. Number two, Victorian drawers are split down the crotch. Yes, Victorian women used the bathroom. SHOCKING! I know. You are not going to be pulling down your drawers to do this. Not in all those petticoats and skirts plus a corset. It was done for convenience. When you see a pair at an antique store they are not "whore's drawers". Well, maybe they were....who knows. Needless to say I am wrestling with this whole open crotch thing when taking pictures. But I manage to get a couple good shots in. I suppose I could just pin them shut for photos....then lazy happens. ;-)

TVE02 regular bodice, no ruffles.

The TMI zone AKA using the ladies room while in costume:

While we are here lets head into the TMI zone! I had someone ask me once how I used the restroom when I am in costume. Well first you hope for normal restrooms VS a porta potty. Then you also hope they are somewhat clean. When you get down to it, it is quite simple. You sit facing the back of the toilet. Pretty much any bridal Q&A website will spill the beans on this technique. I haven't yet been in a situation with only porta potties. Hopefully I never will. I hate those things even when I am not in costume. Also I was recently reading about the 18th century Bourdaloue. Looks like a porcelain gravy boat but in fact was a small chamber pot ergonomically designed for the female form. Here is the Bourdaloue in action.

Painting by Francois Boucher

Also worth noting women did not wear drawers until the 19th century. They wore a chemise, stays (like a corset but a different shape) stockings, garters (ribbons tied around the leg above the knee to hold up stockings) and a petticoat or two. The 18th century lady in the above painting would not have been wearing drawers.

I do not have a Bourdaloue but I could certainly see the need of one for people doing historical reenactment. Especially in a camp situation. 

I also recently read about this nifty invention called the bridal buddy. It is a sheer drawstring skirt you wear under your dress and petticoats. When you have to hit the loo you just lift up the Bridal Buddy and pull the drawstring. It encloses all your skirts and petticoats. Keeps everything off the floor. Well, you can file all this under "the more you know". ;-)


Sunday, April 3, 2016

2016 Port Townsend Victorian Festival and Plaid Walking suit.

I was lucky enough to be able to attend the 2016 Port Townsend Victorian Festival for the whole weekend. I was accompanied by my husband and our two sons. We stayed at Manresa Castle. It was lovely!

I brought five different outfits to wear. Oh my! Four were from the 1890s era and one was an 1870s bustle dress. The bustle dress was specifically for the fashion show. Needless to say there was a tremendous lot of packing. I kept my shoe choices simple. For regular wear I use my Frye granny boots. A nice practical 1.5 inch heel and almond shaped toe. I can wear them all day with no issues. For the ball I wore my American Duchess Tango boots. I love them! But alas a 3 inch heel means only a few hours of wear. They are very well balanced and easy to dance in. I do think a person who is more used to heels could get longer wear out of them.

Friday night there was a Sea Shanty sing along. It was a lot of fun even though I was sober and didn't know any of the songs. I wore my red 1890s outfit for the sing along. I received many compliments on it.

The lady in red!

Saturday was a very busy day. I started my morning selling tickets for VicFest. I did that for a couple of hours. I then went to see a lecture on watches and how women wore them. After that I had lunch with another costumer and friend. Then back to the hotel to prepare for the Victorian Fashion Show. I also needed a bit of downtime. I am fairly introverted but can be extroverted when needed. But I also know my limitations. In order to take care of myself I need a bit of quiet to recharge my batteries. 

The fashion show was wonderful. Happily my husband also participated in this event. After the fashion show we had dinner and then it was off to the ball! I wore my black silk taffeta 1890s evening gown. I used Truly Victorian's Ripple Bodice (with modifications) and the fabulous Ripple Skirt. I also changed out the sleeve to her  TV495, large evening poof sleeve. Yes, very poofy!

Sunday the guys went home in the morning and I joined my friends for a tea party at The Commander's Beach house. It was fabulous! Here are some pictures of the full adventure!

 In the bar at Manresa Castle. Cheers!

Practical 1890s walking skirt and blouse. 

At the fashion show with The Countess.


 Myself and the Mr. Mimi

Manresa Castle before the ball. 

At the ball getting ready for the grand march. 

Commander's Beach House after the tea. 

1890s puff sleeve competition. Lady Rebecca is clearly the winner. 

My friend The Fabulous Val. 

My turn for silly!

Truly Victorian's TV297 1898 flared skirt and TV496 Ripple bodice using the collar and sleeve from the Eaton jacket. Probably my favorite sleeve design.

My latest project is an 1850s-ish dress for a May event. I don't normally do anything pre bustle except a modest amount of late 18th century. So I am keeping the dress simple and easy. I am using a pretty teal cotton print and I may make a bonnet. Not sure yet. If I do it will be a dark brown. Teal and dark brown are in my top 5 color combinations.


Monday, March 14, 2016

Truly Victorian 1898 Flared Skirt TV297 and let's talk about body image

Who doesn't like a red ensemble! I normally don't wear a lot of red because it is hard to find the flattering shade for me. But I finally did! Since I have already reviewed the Eaton jacket this write up is only about TV297.

My love affair with the 1890s continues. Since I am a tad plump (yes. I own it. At 45 years old I no longer feel the need to food ration and starve to get down to some "ideal" weight I cannot maintain.) I am finding that the tailored look of the 1890s is quite flattering. The puff sleeves and flared skirts make the waist it look smaller.

This skirt is easy to put together and the seam lines are flattering. The most time consuming part of 1890s skirts is the underlining and hemming. Because of the bias cut this skirt should hang overnight before you hem it. There is no hem facing required on this one either. I used a mid weight red twill and underlined it with cotton. I also decided to trim the seams with some black gimp. As with all TV skirts I do have to shorten them about 1.5 inches. I have a pair of sensible granny boots with a 1.5 inch heel. I make most of my outfits to accommodate those boots. All in all I love this skirt pattern. I just finished a plaid version. I will post about that once I get some pictures. Be warned with plaids or stripes some seams won't match. I am not so good at matching plaid/stripes so I really don't care...


Body image, a "hot topic" these days. I am not as slim as I used to be. However at 45 and two kids (and 2 c-sections) later I am realistic. I am not going to have the figure I had at 18. Genetics also play a role. I take after my maternal grandfather's side of the family. Shortish chubby (apple shaped) Bretons who emigrated to Quebec at some point (eh) ;-). Once there, intermarried with the indigenous peoples making us Metis to some extent. Trappers and traders. The fun ones. ;-) Maybe this explains my grandfather's swarthy complexion, dark hair and the bluest eyes ever.

Anyhow....got distracted with family history. I grew up in a family of constant dieting. My mom was almost always on a diet. Life was gonna start once she lost that 20 lbs. I started starving myself at age 13 when I tipped the scales at 111 pounds and 5 ft 4 inches tall. I took diet pills and ate probably 800 calories a day. I managed to slim down to 102 lbs. I was so proud. Of course not realizing I was already on a downhill journey of dieting and gaining back. For years. Once I hit my 40s I became tired of this lifestyle. I stopped it and started an even longer journey of self love. I am still making that journey.

But I will add that once you start sewing garments you will have no illusions about your body anymore. You can't hide from the numbers, you must accept them. I love to sew. And I won't be one of those people who say "I will sew for myself once I lose xx pounds". Like they/we are not worthy of loving themselves enough to give themselves pleasure. Whatever that pleasure may be. Buying a new dress, getting their hair done.

And let me add as a final note. Maybe it is the artist in me (thanks dad) but I love seeing the diversity in our world. I love to people watch and see all the different colors, shapes, sizes. I don't see people in just black and white. If you look hard enough you begin to see people's souls, not just what is on the outside. Yes, I admire physical beauty. That is a normal human trait. And sometimes physical beauty can mask the darkest of souls (example, Ted Bundy). Somehow his name sullies my blog, but I will keep it here.

Self acceptance and self love takes time. Enjoy the journey and live your life to the fullest. Treat yourself well. xoxo Mimi

Sunday, January 31, 2016

Larkin & Smith 18th Century Silk Short Cloak

I figured for the ball I am attending next month I may as well make a pretty cloak. Because...well...dramatic hooded cloak!! Again I can blame movie influences on my love of certain wardrobe items. I will point the finger directly at The French Lieutenant's Woman and more importantly, L.A. Confidential when Kim Basinger meets Russell Crowe for the first time. I really liked Kevin Spacey in that movie BTW. And Russell Crowe was good too. But I have a soft spot for Kevin Spacey, John Malkovich and Gary Oldman.

This is only available as a precut kit. You have a nice array of color choices. I decided on classic black and white because I am also classic. The kit comes with all supplies and instructions. Now, it is meant to be completely hand sewn... Haha! Yeah, no. Not gonna happen. Complete respect to people who love handwork that much. I don't fall into that category because impatient Mimi is impatient.

When I constructed it I just did right sides together, clip seams and turn right side out. Easy peasy. The only part I did stitch by hand were the pleats on the back of the hood, and the hood lining over the neckline seam allowance. The trim I pleated via the sewing machine. Needless to say it went together very quickly. I did have to contact L&S just to ask what part of the hood was top, back, front and neckline since  I didn't have any pattern pieces to reference back to.

The fashion fabric of the cloak is black silk satin. I have never worked with silk satin before. It frays a lot. More than taffeta even. However, it has a lovely soft hand and is very pretty. The lining and trim are white silk taffeta.

I really like how it turned out. :-)


Woman of mystery...


Thursday, January 28, 2016

JP Ryan English Nightgown AKA Robe à l'Anglaise in silk. FINALLY DONE!!!

Did you hear the Angels of heaven singing today. No, no you didn't. That was just me because I finally finished my dress!

This is the second time I have made JP Ryan's English Nightgown. I love and adore this pattern and dress style. I cannot recommend it enough.

Now if you read my last post you know that I screwed the pooch on my sacque back gown. I was making it for a ball next month. I decided to shop from my stash for my replacement gown. I pulled out my lovely chartreuse silk taffeta I was hoarding for another project and used it for my English Nightgown. I like the way it turned out and I am very very pleased with the color combination.

I make the easy non pleated back version. The gown goes together quickly, it is just the trimming that takes some time. The only adjustment I had made to this pattern was to bring up the shoulder a bit. They are always too long on me. I won't do a full on review because I already have done. So here are some pictures! 

Pictures updated 2020

First version on the left and re-trimmed version on the right


Monday, January 18, 2016

When you "screw the pooch" AKA the making of a wadder

Sigh.... I hate admitting mistakes. Especially when they have cost me good fabric, and my pride. But when you read a lot of blogs sometimes it seems like no one else makes wadders (taking the thing you made and wadding it up to toss out) or burn it, burn it baby!!!

There is a fantastic Venetian ball next month that I will be attending. I decided to make the gown of my dreams. The gown I have fantasized about since seeing Dangerous Liaisons in the movie theater circa 1988. I fell in love with the costumes and also with John Malkovich as Valmont. He was such a bastard, but I was completely captivated. What can I say, sometimes the bad guys are...well....you know...

The dream gown is this:

The Robe a' la' Francaise. I mean, who doesn't love this gown!

My initial planning had me making a black and gold brocade Francaise. The skirt and stomacher were going to be the gold and black brocade and the gown black silk taffeta. 
Side note: My husband will be wearing a blush pink and gold brocade 18th century suit. I have it all made up for him and he is thrilled. Yes, the pink was his idea. He thought it would be nice if I wore pink too. Now, I am not much of a pink girl but there are a few shades I like. Blush pink being one of them. So the black and gold were shuttled away for now, and I happily went shopping for the right shade of pink. Found some beautiful taffeta online and made my purchase. Ooooooo I was so excited! 

Once I had all my ducks in a row. Fabric ready, pattern cut (JP Ryan pattern), machine oiled. Time for fitting the under bodice. The outer gown attaches to a fitted under bodice. So that is your starting point. I made a couple muslins and really felt like I had the under bodice fitted very well.

The under bodice

The entire gown is meant to go over this. It will be attached around the neckline and down the front near the seams on the under bodice. Then a stomacher covers the lacing panels. The stomacher could be the same color as the gown or a contrasting fabric. Once it all comes together you have this lovely graceful gorgeous gown....


A few things went wrong. The first being I don't make a whole lot of 18th century gowns. The second was this particular gown was a bit more challenging in regards to fitting. Beyond my abilities. 

On the plus side I put the whole gown together. No problem. The instructions were easy and the back pleating super easy. No issue with the pattern. But when I went to attach that gown to the under bodice it looked like a nightmare. The neckline was perfect, no issue there. But the body of the gown in the front was horrid.  Drag lines everywhere. I followed the instructions and smoothed and pinned and smoothed and pinned some more. No Bueno. I even tried pinning the fitting lines on the back first, to see if I was just getting extra fabric spillage on the front. Nope. Actually the back looked great when I had it all pinned. I feel like the front of the gown bodice was too long and too wide for the under bodice. I had made one minor adjustment to the under bodice during fitting and I had made sure to copy it over to the gown pattern as well. I SHOULD have made a muslin of the gown too. Sigh...Nothing in the directions say to do this. Only to muslin the under bodice and copy over the changes to the gown also. ALL that beautiful pink fabric gone gone gone!! The fabric budget gone gone gone!!! Argggghhhhhhhhh!!


At some point this is all you can do. No I did not wad up the dress and toss it. It is laying to the side for now. I don't know that it can be salvaged. But I still need a dress for February. So I picked up all my shattered Dangerous Liaisons dreams and dug out my JP Ryan Robe a'l' Anglaise pattern. A tried and true. I made one in linen last year. Then off to my stash. I have some lovely chartreuse silk taffeta that I had purchased for a Belle Epoque dress project. Well, there was my gown and petticoat. Plus I have loads of blush pink scraps and selvedges for trimming the new gown. Green and pink are a nice 18th century color combo. I will be adding gold accents as well. This way husband and I will at least look somewhat similar at the ball.


Here is the new gown! The floral part is an under petticoat, so it will not be seen. The skirt of the dress will be the same green as the gown.

Before I sign off I have a few notes on the JP Ryan pattern:

1. Muslin the under bodice and the gown. At least the top part of the gown.
2. If it is your first Francaise maybe make the short version.
3. The sleeves are tight. Unless you have very thin arms make a muslin of these as well.
4. The construction of the dress IS NOT hard. Even the back pleats. But it is time consuming.
5. I honestly think a lot of people will need a fitting buddy for this dress. This is a hard style to fit on     oneself.
6. Mark all your pleats clearly. I used a Frixon pen for mine. Be warned, Frixon pens will ghost on silk even after you have ironed the marks off. But I don't worry when the marks are buried into a pleat. Also the marks will completely come back if you are below freezing temp. FYI and the more you know.