Thursday, December 3, 2015

Truly Victorian Talma Wrap TV500 bustle era outerwear

TV500 Talma Wrap

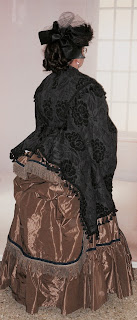
This is the second time I have made this wrapper. The first one I did was for a neo Victorian gothic costume. It was made out of black faux suede. This new one is made out of a light weight wool jacquard coating. I found this fabric on Marcy Tilton's website. Much of her fabric is for the modern garment maker. As a person who does make some of my own every day clothing I am familiar with her product. I decided I only want to make one wrapper, so it should be a dark color. Navy or black goes with everything. Also I wanted something of decent quality that will last. So once I spotted this fabulous fabric I knew it must be mine!


I cut the size large and no fitting was needed. I recommend stay stitching the curve of the sleeves. It is very easy for them to stretch out during construction. The Talma goes together quickly and I had zero issues with the pattern or instructions. It is bag lined and has a ribbon waist tie on the inside. Haha! Basically a bustle poncho! Not a whole lot to review really. It does take a bit of trim, 7 to 8 yards I think. Also, if you live in cooler climes you can add a flannel underlining. I have lightened the pictures a bit to show detail.


Tuesday, December 1, 2015

Truly Victorian TV405 Vest Basque Bodice my 1870s silk bustle dress plus new undergarments!

This all started with the silk taffeta that arrived looking nothing like the color I thought it was supposed to be. I was expecting an olive-ish greenish something. It is, well... Brown. Sort of toffee colored with a shimmer of golden olive. It left me in a quandary. I was (and still am) planning a pretty green bustle dress. But this fabric, even though not expected, was drawing me in. A challenge. A color that does not quite suit me. I really wanted to make it work. This fabric is papery crisp and has the most delightful swishing sound when I walk around in it. I cruised around the internets and finally landed on some blue and brown micro check silk shantung at Mood. It was 9.99 a yard and the brown shade in the check was an exact match to my taffeta! Plus knowing I was going to use it as the vest part I didn't need to buy 9 gazillion yards.

TV405 Vest Basque:
I had not made this pattern before. It has been sitting in my stash for years (like 4). I know, I am so drama. ;-) The only thing I wasn't digging about this pattern was the cuffs. Those would drive me crazy. So I substituted the sleeves of TV403. They fit great! I found this bodice easier to fit. I think because on my last one I had finally worked out some issues and confusion I had been having. I took out a 1/2 inch fold across the back. As you can see it rid me of the back armhole lump bubble o' fabric I normally have. As usual I shortened the upper bodice 2 inches and I adjusted the front shoulder seam to get rid of that front armhole fabric lump bubble that always wants to become a dart. It did help quite a bit. I had no issues putting the bodice together. It was easy. You treat the vest seam as the second dart. I wound up making that seam a little smaller for fitting purposes. I really love this bodice and plan on making it again. It is very flattering.

The skirts are TV201 and TV305. All worn over the TV108 grand bustle. I also made two new petticoats, and two (yes two!!!!) combination underwear. One is baby pink and one is black (meow!) I will never make a separate chemise and drawers again. Historically accurate be dammed! Combinations all the way!


I decided to just make a basic black hat. It is the same hat base as my kelly green one. Easy and quick! Goes with everything!

Here are all the undergarments:

Truly Victorian Grand Bustle:


Truly Victorian petticoats View 1:

 First petticoat in pink!

Second petticoat in cotton lawn leftovers.

Truly Victorian combinations TV105:
This was surprisingly easy to make. The most time consuming part is all the facings. I recommend using interfacing of some kind on all the facings for stability. I had no trouble fitting this garment and it does go together pretty quickly. I shortened the length on the legs only, for reference I am 5ft 4in tall. I really like the low neckline. It doesn't show at all when I am wearing my gowns. I left off the mini sleeves and just finished the arm holes with bias. I put separate garment shields in my bodices and didn't want any additional bulk.


All in all, I am satisfied with all I have achieved in the month of November! I am especially pleased with some new undergarments. I don't enjoy sewing them very much. But I did manage to keep my focus and get them done. Yay!

Wednesday, November 25, 2015

Truly Victorian 1870s Day Bodice TV400, Tie Apron Overskirt TV301 and 1870s Underskirt TV201

I needed a new bustle dress for a museum event in October. I was thinking about the 1870s AKA the early bustle era. At some point I had bought a butt load of some close out last chance sale plaid silk shantung. I figured I would make a full bustle dress out of it. Well, once it arrived I realized the primary colors (golds) were not something that works with my coloring. So I set it aside until I found some other colors that would work with it. A friend helped me choose a really pretty kelly green to match the plaid. That is what I decided to use as my TV400 bodice fabric.

TV400 Bodice
The bodice is easy to sew together. I have standard fitting adjustments that I use for her patterns. However, as per usual I never account for the extra room boning and a bag lining take up. So it was a touch too tight. Well, no matter what I was going to make this work. Enter my favorite fitting tool, the button placket. I added what basically amounted to 1/2 an inch to each side of the bodice. Fitting problem solved. I really like this bodice and in fact have made another one. The back peplum is easy to do. I know some people get confused by the pleats on her other bodices. The back peplum is a good alternative if you don't want to fuss with pleats. I did add a waist stay as well, even though she doesn't call for that. I think if you are new to her patterns and want to make your first bodice this is a good jumping off point.

TV301 Tie Back Overskirt
This is a very easy overskirt to make. Great for a beginner. It is unlined so you want to make sure your fabric has no right or wrong side because it will show when the skirt is tied. You also need a bodice that has a peplum across the back to drape over the tied part. This skirt is really all about the trim. So have fun with it!

TV201 Basic 1870s underskirt
This underskirt id meant to be worn over the grand bustle. The grand bustle has two hoops on the bottom. In the late 1860s and early 1870s they were still transitioning out of hoop skirts. This skirt is easy to put together and it is really all about how you trim it. I used 2 ruffles of my plaid fabric. I wanted more but I was running low and still had to make the overskirt.


What kind of boning Mimi uses:
The lazy kind. I am a big fan of German plastic boning. In my TV400 bodice I used German plastic on all the seams except for the curved back seams. For those I use the spiral steel. FYI German plastic boning is just a high quality plastic boning. The stuff you can buy at craft/fabric stores is not good for much. You would be better off using heavy duty zip ties if you can't access the German plastic. The German plastic and the zip ties are very similar in weight. I like to use the plastic because it is quicker to work with. No cutting metal and tipping it.

Hey! And let's also discuss fabric covered buttons. I LOVE fabric covered buttons. However buyer beware because the ones you buy at the fabric/craft store are chintzy! I lost two on the day of the event. The metal loop that you sew onto your garment pops off the backing piece. There is no way to fix it, except replace the button. Learn for my fail. I am lucky enough to work at a business that has a professional button cover press. So I will be using that from now on. The buttons that we cover and sell are higher quality and don't come apart. I have no idea why I didn't use that in the first place...


Saturday, September 26, 2015

Truly Victorian TV296 Ripple Skirt, TV498 Eaton Jacket with TV495 Gigot Sleeve

Review of Truly Victorian Ripple skirt TV296 and Eaton Jacket TV498 with gigot sleeves TV495. The RIPPLE skirt goes together easily. But don't think this is a quick project because of the simple lines. The skirt is underlined and has a hem facing. Because of this, the hem will need to be sewn by hand. A true fabric hog. I cut out my usual size (36 waist). What is nice is that she tells you what the finished hem length will be (42 inches) Too long for me. You need to make your alterations to length before you draft your hem facings. I did get into some trouble there. My length adjustments still left it too long, not on the front panel but the sides to back. Also there is some bias involved so you will want to let your skirt hang before you hem it. I decided to let it hang on my mani overnight and then just trimmed at the hem to the proper length. Not fun, but it all worked out ok. I was not able to use the drafted hem facings because they wouldn't fit anymore due to my length adjustments. So I ordered some 6 inch wide horsehair braid to use as my facing. It worked great. The skirt has a length of twill tape from sides to back that hold the ripples in shape. You will need to pin and drape to get the ripples just so. This was a fun skirt to make. Bear in mind you are hauling around a tremendous lot of fabric. There is 6 yards of sweep at the hem. My skirt weighs almost 4 pounds. I used a midweight cotton double weave. It looks like wool but is all cotton. I don't know when I will make another one. I would like one in black but may just go with the walking skirt for that. 

EATON Jacket, fun to make! I cut my usual TV sizes G back H front. Did my standard adjustments. There were no surprises. Goes together quickly. It is fully lined. I chose the large GIGOT sleeve from the TV495 patterns. You will want to make a muslin because the lower sleeve is very tight. I added an inch to the width in mine. These sleeves are very bulky and heavy. You will need lots of netting and I even put in an extra header of crinoline (looks like buckram). Because the sleeves were so heavy I also added shoulder pads because my shoulder was collapsing and it looked sloppy. Between those pads and the extra header it made a huge difference. Looking at the back of the jacket I could have padded out the upper shoulder area where those wrinkles are. In Joi Mahon's fitting book she talks about padding out when alterations aren't going to do enough. Like in this case with very heavy sleeves.

Side note the corset belt is TV492. Easy to make. Right now I have ribbon lacing but I will probably trade it out at some point. The sleeveless blouse is Wingeo 1890s blouse. Runs HUGE! But I like the gathered front. Hat is a Lynn McMasters pattern. I am very happy with my outfit. I will be wearing this to the Steamposium tomorrow.


Beneath it all, 2 petticoats, chemise, corset. I could use one more petticoat but I don't have the time. Not gonna sweat it though!

Sunday, August 9, 2015

ElsewhenMillinery PDF Cloche hat pattern The Sybil

I love hats! And I do enjoy making them. I have several patterns by ElsewhenMillinery on Etsy. This is the first of her patterns I have made. With this pattern you will be using millinery wire in the brim. If you haven't done this before or made any hats ever, then I would probably go with an easier pattern first.

In most of her patterns she is asking for mid weight fabrics. I used a lightweight silk taffeta. To give the fabric more body I underlined it with mid weight cotton canvas. The hat body also has a lining. I used a light weight cotton lawn.

What I really love about her patterns is she goes up to a size 25. The 20s cloche was meant to sit way way down on your head. Well this chick Mimi has a big head, 23 1/4 inches. Her instruction are very thorough. And she does discuss sizing and how the hat should fit on your head. I made the size 24.

The whole process of putting the hat together is very straight forward. However, if you make the view without the bias binding on the brim you will be stitching a wired brim to the hat body. I chose to do this by hand instead of trying to wrestle it on my sewing machine.

The finished hat is lovely and it fits perfectly. I forget I am wearing it because it is so comfy. My advice is to read through all her instructions before you get started. Look at all the pattern pieces and don't forget to add seam allowances. I would highly recommend her patterns.


Saturday, August 8, 2015

Butterick 6093 Downton Abbey dress

I just finished making this dress in time for a Downton Abbey themed garden party at Dunn Gardens in Seattle.

I chose view "A" because I think the envelope picture of view "B" is ugly. However, The Pragmatic Costumer made a revised view "B" that was fabulous.

This is a fairly easy dress to sew. I would not say it is for a beginner, but if you have a few dresses under your belt and can do some pleating, sleeves and a zipper, go for it.

Sizing. This runs true to size as far as the finished measurements go. I graded several sizes together to make my dress. My FBM is 42 inches D cup. High bust is 36. I did not want to do a FBA (full bust adjustment) so I did a cheater FBA. I cut size 14 in the neck and shoulders. Size 16 on the side seams.

But wait! If Mimi's bust measures a 42 how can she cut a size 16 and not do a FBA? Size 16 is for a 38 bust. Well, you see all those gathers on the under bust of the dress. Those are your friends. I just used less gathers for my under bust seam. Simple!

I do have a D cup and we know most patterns are designed for a B cup. But I found there was plenty of room. Now, if you needed to do a FBA you would just rotate the FBA dart down into the under bust gathers. Still easy, but I was super lazy.

Skirting the issues:
Where I could have gotten into big trouble is the waist/hip area. Luckily I read The Pragmatic Costumers review BEFORE I cut my fabric. This dress is a very columnar style. And even though my hips are never a fitting issue for me, on this dress they would have been. So I sized up the skirt to about a 20 (44 hips). My hips are 43, fyi. I sewed the darts and did the pleating. And I just used less gathers on the bodice once I attached it to the skirt.

There were some changes:
View "A" is a fabric hog. I did not realize it is a double skirted dress (over skirt and under skirt). TWO WHOLE SKIRTS!!! Duh! Well of course I ran out of my floral fabric...And no more to be found either. So I needed to think outside the box. One of the things I did not like about this pattern is the vent on one side of the skirt. I understand why it is there, but it is a very modern solution for the narrow skirts of that era. So I decided to make the under skirt a separate garment. I used the provided underskirt pattern and added a few inches to the back seam. I used a simple drawstring waist to finish it. By adding that extra fabric to the back I did not need the side vent for walking. My under skirt has ample room but still kept the column shape of the time period. My underskirt is also a false bottom skirt. I wasn't going to go buy 2.5 yards of fashion fabric when I could buy .75 yards and use muslin for the top of the underskirt. No one is going to see that part of the skirt anyway. You can't see in the picture but the visible underskirt is a light green and white check linen.


Updated pictures 8/11/2020


The quick and dirty round up:
Make a muslin. If you are over a D cup you may want to do a FBA. Really pay attention to the waist/hip size and make adjustments. I give this pattern a thumbs up and it has gone in my favorites drawer. I will certainly make it again.

And......


Yes, Sean Bean...since you asked...Ahem 


I'm wearing a Titanic era corset (purchased) a princess petticoat and Edwardian combinations under my corset. 
Monday, March 9, 2015

Truly Victorian Corset TV110

My first TV110 was too small. What was nice about screwing up the first one is that I was prepared for the second one. The corset took me about a full week to make. What is time consuming is cutting and tipping the boning as well as setting the grommets. Oh, and stitching all the boning channels. For my second one I used 1 layer of quality coutil and an outer layer of corset brocade. Corset brocade is different from the regular brocade fabric. It is stiff like coutil. Really nice to work with.

I went one size up from my last corset. And I followed TV instructions regarding cup size. Basically your waist/bust ratio will determine cup size. I normally wear a D cup bra, but sized down to a B cup for the corset based on my waist/bust ratio. Just read her instructions on sizing carefully so you don't wind up with too large a cup.

The other thing I did differently for this version is use a spoon busk. For gals with a tummy it really makes a difference. You can see in the pic below.

You see how the bottom of the spoon busk is nice and flat against my belly.  The standard busk in the other corset actually swooped out a bit at the bottom. I didn't care for how it looked. The other nice thing about a spoon busk is how heavy duty they are. Very substantial.


 Back of the old one laced to a 36". Just too small.

And the new one. Perfect, laced to a 36 with a 2 inch gap.

And here is my Mantua Maker 1880s short petticoat. It is a yoked petticoat meant to be worn under the corset. I used a pin tucked cotton fabric from Joanns. It gave nice body to my skirts and no bulk to my waist.


Thursday, February 26, 2015

Hello! My first post.

My first blogging experience! Right here, right now. Writing is not my strong point, so this may be a bumpy ride.

About me. I am a 40 something wife and mom to boys. I have been sewing on and off for over 25 years. Everything from quilts to clothing. I also dabble in mixed media and knitting. But this blog will really be sewing focused. I make both modern and historical clothing. I am an old soul and very fond of the late Victorian bustle area. I also adore the mid to late 18th century. I like Regency, but am not inclined to make clothing from that era, yet......

So now that you know a bit about me, I need to go figure out the rest of this blog thingy.....