Saturday, April 22, 2017

Cosplay McCall's Shape Shifter Corset pattern M2032

I like the Cosplay McCall's patterns for the most part. The designs are fun and they are nicely packaged. I have several of their patterns and look forward to making them at some point, says every costumer ever...Never enough time in my day.

I made M2032 view B for a friend of mine. We have a goth/vampire themed event coming up and, well...I had some red skull mesh fabric. When in Rome. :-)

Pattern:
Two styles of under bust corset. View A-no hip gussets, View B-hip gussets. My friend has a fabulous hourglass figure so I thought view B would be perfect. Pattern is printed on thin tissue paper. For 21.00 you would think heavier paper would be included. The instructions are very clear and well written. They even have extra notes on putting in a waist stay. Both are really nice solid designs.

Sizing:
Oh my!!! Sizing....DO NOT even think the finished measurements printed on that tissue are accurate. Pretend they are not there. They are so far off I don't know why McCall's even bothered. I was left wondering if I was incompetent, crazy or both. How can something you are selling for 21.00 be. so. wrong. Here is my advice.

1. Use the sizing guide on the outer envelope.
2. Ignore the bust measurements, really.
3. Find your desired waist size, not your actual waist size.
4. Example, I have a 37 inch waist. I would like to lace down to 34. So I pick size 18. Now that being said size 18 will be approximately 32 inches laced fully closed. So in theory if I go with size 18 (32) that will give me a 2 inch gap laced down to my desired 34 inches. I don't want a fully closed corset, I like a gap. If you don't want any gap then just pick your desired waist size. But bear in mind if your corset stretches out it may become too big.
5. Make a muslin. Truly, you will be much happier if you do.
6. In the most simple terms, go down a couple sizes.

Now on to finished garment measurements. I made two different sizes/muslins, here are the approximate numbers:

Size 16 laced fully closed
waist 30 inches
hips 40

Size 12 laced fully closed
waist 27 inches
hips 38

Printed on the pattern tissue the 16 was supposed to be a 27 inch waist and the 12 was supposed to be 23 inches.

The other interesting thing is the gussets, side front, side and side back are all one size. No difference at all between sizes. I don't know anything about pattern grading so I can't say if this is a normal thing or not. But that is a pretty broad size range. The other corsets I have made all had each piece graded, no universal sized pieces. Gussets would be the only exception.

Changes I made:
I prefer to use bone casing tape instead of making my casings with the lining or seam allowances. My corset is not lined. Fabrics I used, red skull mesh, coutil and underlined it with twill. A really great book I cannot recommend enough is The Basics of Corset Building by Linda Sparks. It covers the construction methods for several different types of corsets.

Construction:
Fairly simple. I would not recommend this pattern for a beginner. My most favorite pattern for beginners is the Laughing Moon #113, under bust corsets. They have good sizing info and there are no sizing surprises.

Remaining crumbs:
Corset requires a 10 inch busk. If you lengthen or shorten it that size will change. The seam allowance for the body of the corset is 5/8 inch. For the top and bottom it is 1/4 inch. Since I didn't use a lining I bound off the bottom and top with bias tape. This corset really has a great shape. I don't know if I will make another. The sizing aspect was very frustrating. :-/

 Sexy AF. The red skull fabric was bout at JoAnns in the halloween section. It is a sheer mesh.


 Not even a little bit accurate.

Larger sizes not accurate either.
These 3 pieces, plus gussets (not shown) are all the same size, for all the sizes. FYI

Wednesday, April 12, 2017

Port Townsend Victorian Heritage Festival 2017

The first weekend in April was the Victorian Heritage Festival in seance Port Townsend, Washington. I was somewhat surprised to see VicFest on the calendar because 2016 was supposed to be the last year due to lack of volunteers. Happily enough some wonderful folks stepped up and decided to revive it. There is already talk of a 2018 VicFest, how fantastic is that! I participated in the fashion show on Saturday. It was so wonderful to see many of my friends and we all had a wonderful time! Here are some random pictures of the event.

 At the Commander's Beach House for tea! We were very color coordinated that day.

 The lovely Lady Rebecca

 Caught taking a selfie!

 Once a mom always a mom, helping with shoes.

 Commander's Beach House and good friends!

 I'm so famous!

 This guy...He must have taken a wrong turn at the border. This was my fashion show outfit. Truly Victorian walking skirt and Eaton Jacket. You can't ever go wrong with those two patterns.

 Lovely view!

 Lady Rebecca and her magnificent bustle!

 Tea time!

 Two of the most lovely people!

 Ready for the dance social! Truly Victorian Umbrella skirt and 1883 Tail bodice.


The skirt is one piece cut on the cross grain. It works very nicely with a horizontal striped fabric. With careful cutting and matching the back seam stripes will chevron. It looks awesome, but of course you can't see it. ;-) 
 I do have plans for a true 1890s bodice. The one I was working on did not pan out, so this was my back up. 

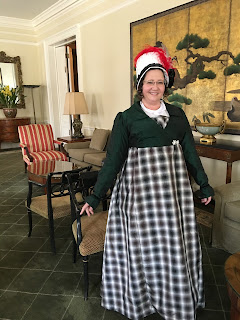
My grey plaid Regency dress using La Mode Bagatelle patterns

There was a fabulous event this last weekend put on by the Jane Austin Society of North America. (JASNA) I made this dress last year but didn't have any good pictures of it until now. I am wearing my Wingeo stovepipe hat and a green silk taffeta spencer (Laughing Moon #129). This post is focusing on my La Mode Bagatelle dress.

Pattern:
Realistically this pattern set is all you would need for an entire Regency wardrobe. The whole package is beautifully put together and loaded with different styling ideas. I made the faux drop front dress with shaped skirt (view D). This puts my dress a bit later in the Regency period. I prefer the Regency styles from about 1810 on up.

Sizing and fabric:
I used size 20. My measurements in stays are approximately 44 bust, 39 under bust and 37 waist. I made no alterations to the bodice pattern. The skirt I shortened by a couple inches. My fabric is silk taffeta and the bodice is lined with sturdy white muslin. The sleeves of this era run long anyways so I didn't shorten them.

Construction:
I didn't really have any issues with the directions. The gown went together easily. The sleeves have 4 notches along the sleeve cap. The double notch is the back of the sleeve. The next notch you match near the shoulder seam. Put the fullness where you need it. The last two notches match to the armhole notches at the front.

UDATE: 6/30/2017
Ok, so I am making view D again with short sleeves. I realized I had put the bias neckline casing in wrong on my grey dress. Not that it matters, however it did bring to light an issue with the directions. I think this will also apply to view C as well. On view D if you make the neckline casing via the instructions you will have no way to use the drawstring. Solution ---Make a single small buttonhole on the center front bodice LINING piece (right side of fabric). That way you can access your drawstring. On view C (crossover bodice) I am not sure how to manage that. Once you sew your skirt to the bodice you will essentially sew your drawstring casing closed. Also, it's difficult to tell from the drawings but you sew the drawstring casing to the wrong side of the bodice lining. It winds up sandwiched between the fashion fabric and the lining. Make sure when you under stitch it you are very careful. A few wrong stitches and you won't be fitting much through that little casing. But the under stitching really makes a difference.

End notes:
I really like this pattern. It's only flaw is that it buttons up the back. ;-) This dress has a great shape and the waistline is nice and high. I also like the fact there are no gathers under the bust line. The gored A-line skirt is very flattering. I will definitely make this again. I would like to add a couple more cotton Regency dresses to my wardrobe for summer. I will probably use this pattern for one of them.

Laughing Moon #129

Pattern:
Cross over spencer jacket with 3 different collar options and hem finishes.

Sizing and fabric:
Just like my pink pelisse I used size 22. I shortened the bodice by 1/2 an inch and shortened the sleeves 1.5 inches.

Construction:
Easy. No issues.

End notes:
I like the ruffle on the back. And the collar is super flattering. This is a really cute little jacket and I can see why they were so popular.

 Looking very plaid!


 The Countess looking demure.

 Friends time!

 Silly picture!

 Someone didn't get the mustache stockings required memo...

 Fun times on the stage!


Monday, April 3, 2017

My Edwardian plaid outfit Truly Victorian patterns TVE30 and TVE45

This last weekend was the Port Townsend Victorian Heritage Festival. There was much fun having!

I must admit to being completely and totally inspired to make this when I stumbled across The Antique Sewist's blog. She made a plaid version of TVE30 and TVE45 and I fell in LOVE! I knew at that very moment I needed a plaid Edwardian outfit. Nothing would stop me, even the lack of plaid fabric in my stash. I already had both the patterns and just needed some kind of fabric to fulfill my plaid dreams. A few days later I was at one of the local fabric watering holes and stumbled across this somewhat bright turquoise and purple plaid. It was love at first sight! It was on sale too!! So I quickly bought some and lovingly cuddled it all the way home.

I will start with TVE30, the skirt.

Sizing and alterations:
I cut a straight size I (36 waist). In my Edwardian stays I measure 43 bust, 37 high waist, 36 waist and 43 hips. You really want to pay close attention to your high waist, the is your jumping off point at fitting this skirt. Now as you can plainly see from my measurements I am not concerned about my hips. If you have a nice hip spring you would cut your hip size and blend it to your waist size, or you can play with the darts for adjustment. Also if you are taller than 5ft 4in you will want to lengthen the skirt. My alteration was fairly simple since I only needed a bit of extra waist room. I made the skirt darts a tad bit smaller (about 1/4 off each dart side at the top) and then blended it back into the rest of the dart. That gave me about an extra inch. For the inner waistband I just made it a bit longer and folded in the ends to make the belt fit my high waist. There are very small darts on the inner waistband and they are so teeny I didn't want to mess with them. That was it. The length was perfect for me and my 2 inch heels.

Fabric:
Yeah, I loved that plaid until I realized how uneven it was...I am somewhat impatient. Even plaids and even stripes are not super difficult to work with. However, when you toss the word "uneven" into the mixture things get dicey. So turning to my trusty Vogue sewing book I read about uneven plaids. Hmmmm...Not for the plaid novice. Great! It takes a lot to discourage me. And I was going to have that damn plaid dress, even if it killed me. Vogue says on the uneven plaids you have to pick a focus point on the plaid and just run with it. That is what I did.

 I patiently cut out my pieces in a single layer trying to keep it matched on my chosen focus point as I could. I knew with the lapped seams the plaid wouldn't be a perfect match but I managed to get close enough. It's certainly not perfect but I am pleased with my effort.

My fabric was some kind of mystery blend not quite mid weight suiting. I underlined my skirt with quilting cotton. Please, underline your garments. They hang so much better and you can just transfer your marks to the underlining. So easy. I used petersham ribbon for my belting. I found some on Etsy and bought several yards. It's light blue, but no one can see it anyways.

Construction:
Not difficult. On my underlining I marked ALL THE THINGS. Every seam line, every dot and dart. Read the instructions carefully and follow them. The skirt came together like a dream. The placket seaming instructions seem strange, just follow them. It will be ok. I chose to use buttons as my main closure. I would rather make buttonholes than sew on a million hooks and bars.

Final thoughts:
I love this skirt! I even made another in dark navy wool suiting. It goes together much quicker when you aren't worried about matching plaid. A very satisfying project. TV gives great fitting info with the pattern.

TVE45 Narrow Panel Blouse

Really quick and easy to make. Since my bust is 43 I decided to use size H (44), view A with 3/4 sleeves. I did no alterations.
My fabric was not a bordered fabric but I went with view A anyway. I decided to cut my center panels on the bias so I wouldn't have to worry about plaid matching. I accidentally gave my blouse shoulder seams because I wasn't paying attention to the fact you have to tape both pattern pieces together at the shoulder to make it a single piece. (duh). Sewed up like a dream.

Final thoughts:
Easy. Great for a beginner. Instant gratification. I will make more of these.

Underneath it all:
Combination underwear, corset, stockings, a single petticoat. My under blouse is a lucky vintage find (because it is a larger size). Time wise it is WWI era but I didn't care because I didn't have to make it. I also loathe high collars. So this was a nice compromise. The blouse is completely hand sewn. It is labeled The Butterfly Blouse, size 42. It has a few minor flaws but that is to be expected. I will make a proper blouse to wear under this top, someday.